|
Version 11 - March 2, 2019
(in-progress)
Once you've registered, you may
LOGIN using your
UserName and Password. Currently on the Login screen you have
access to the TTRC 2017/2018 Route-Card Rallies, the
Crowless 2018 Route-Card Rallies and Real-Time Practice Rallies.
Your Login may be restricted subject to the events you have entered.
Click on
Login Help for more information.
Depending on the type of rallies you are
accessing you will be taken to either a Route-Card
Rallies Status or Route-Card/Real-Time Rallies Status
page.
There are examples below.
The tools that you use
to plot a route are below in the section How to Plot a Route.
Most of the tools are the same for Route-Card or Real-Time
Rallies. Differences are highlighted.
When you have plotted a Route-Card route and have submitted
it for marking, Route-Card Rallies Results Feedback
describes the information that is fed back to you.
Information on how to compete on a Real-Time Rally
is shown in Real-Time Rallies Procedures.
You should
also study the frequent Questions/Answers page.
Route-Card Rallies Status
Here's an example screen: (This is almost redundant and will
be replaced by the Route-Card/Real-Time Rallies Status screen.)
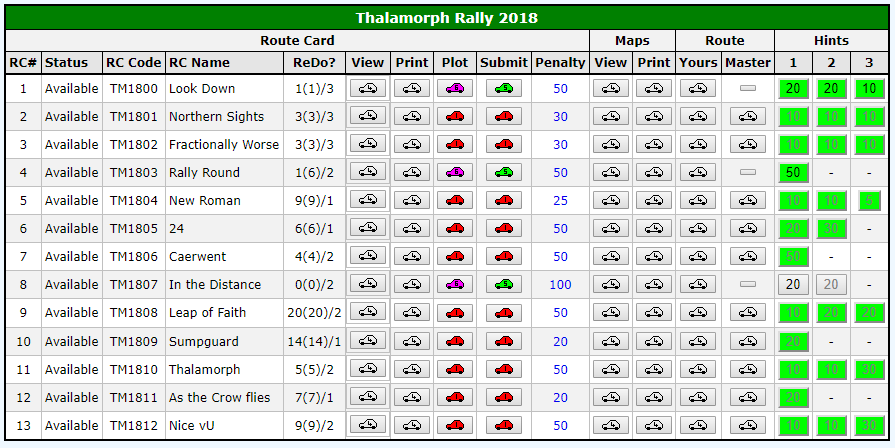
RC#: shows the route card sequence number.
Status: No Data - the route card is not
on the system; Not Open - the competition isn't open yet; Available
- available and open; In Progress - your solving/plotting in a
competition is
in-progress; Closed
- the competition has closed.
RC Code
The internal code for the route
card. For route card setters this will appear as a clickable
button.
RC Name
The name of the route card.
It may be a clue to the type of plotting required.
ReDo?
Every route card is allowed a number
of submissions for marking. A single submission means you
plot/amend your route as many times as you like, but can only
submit once; in other words you need to get it right first time.
Some route cards allow a ReDo where multiple submissions are
possible. The feedback that you get (see below) can sometimes
pinpoint where you might have made a navigational error.
There
are three numbers here a(b)/c. c is the number of submissions
allowed; a is the number of submissions used during your
current attempt at the route card. When have reached the maximum
number of submissions you will no longer to be able to change your
route.
After a competiton is over and the results have been
published, you will be able to continue your attempts at solving
the route card. This will be shown as (b) - see also Plot
below.
Route Card/View
When the
 car icon
shows, clicking it will display the route card navigation
in a separate window. You will also be able to view the route
card when you are plotting the route (see below). car icon
shows, clicking it will display the route card navigation
in a separate window. You will also be able to view the route
card when you are plotting the route (see below).
Route Card/Print
When the
car icon
shows, clicking it will display the route card in a convenient
form for printing.
Plot
When the route card is first
available to you, a green car
 will be
shown. Clicking this will: enable the View and Print buttons
above; start the timer for how long you take to submit your
final solution; and the car will turn blue. will be
shown. Clicking this will: enable the View and Print buttons
above; start the timer for how long you take to submit your
final solution; and the car will turn blue.
Clicking the blue
car  will take
you to the map where you can plot your route. After your first
plotting session, the Submit button will appear (see next item)
and any hints for the route card will become available (see
below). will take
you to the map where you can plot your route. After your first
plotting session, the Submit button will appear (see next item)
and any hints for the route card will become available (see
below).
When you have submitted your route for marking, the
car colour will change to: magenta
 , if you
haven't used your submission quota; or red , if you
haven't used your submission quota; or red
 , if you have
reached your submission limit. , if you have
reached your submission limit.
During a competition, when the
car goes red (because you used all your submissions) you will no
longer to be able to modify your route.
Once the competition
is over and the results have been published, you will have two
options to continue. 1) You may keep your original route and
reset your submissions to zero. This allows you carry on where
you left off in a competition. Your total submissions count (b
in ReDo above) will continue to grow. 2) You may start the route
card from scratch as though you were seeing it for the first
time, however as in 1) your total submission count will continue
to grow.
Submit
The green car
button will
appear after you've plotted your route for the first time.
Clicking the button will take you to a form where you can add
comments about your plotting or solution, rank the route card on
a scale of 1 to 10, and send your solution for automatic
marking.
Your route will be compared with the master route and you will
be taken to the Result Feedback page (see below).
After your final
(see ReDo above) submitted solution the car will
become red and
will not longer be able to edit your route. However, further
"free" submissions are possible (your submission count won't
advance, nor will your elapsed time solving the route card) to
have your solution re-marked n the event of the master route
being changed.
Penalty
The penalty from your last
submission is shown. You may click here to display in ranked
order the penalties from other competitors who have attempted
the route card. Ranking is in order of penalties, number of
submissions and then elapsed time solving the route card.
Maps/View
When the route card is
available you may click on the car icon to display the map you
will use to plot your solution.
Maps/Print
This is similar to Maps/View
except the whole map will be displayed in a new window. This
will allow you to print the map using the print facilities
available to your browser and printer. The extent of the map is
usually set so that it fits to a 1:50000 paper map scale on a
sheet of A4.
Route/Yours
Once you've started a route card, you can view your plotted
route by clicking the car icon.
Route/Master
When an event has finished you
will be able to view the master route by clicking the car icon.
On the master route TCs are shown with a red circle; PCs with a
blue circle; and there may be other information markers. Hover
over the circles/markers to display the control name/information
above the map.
Hints
Some Route Cards may have up to three hints
available to help you with a solution or plotting. You may open a
hint at any time during your solving/plotting period but will
incur the one-off penalty in minutes shown in the hint column. The hints
(if more than one) will be progressive in use (Hint 1 before Hint
2 before Hint 3) and information. If you are stuck on solving a
Route Card always take the hints since this will give you the
satisfaction of being able to submit a solution without incurring
a maximum penalty.
To see a hint click the button. You will be
asked to confirm your request before continuing.
Your objective is to accurately plot this route on a map and
approach and depart the TCs and PCs in the right direction.
You'll lose points if you don't visit the controls correctly.
Correctly means:
a) that your plotted route passes through the defined point of
the
correct location and
b) you visit the points immediately before and after the control, and
in the correct order.
You will need to be particularly careful when plotting the
route around small loops.
Real-Time/Route-Card/Driving-Test Rallies Status
Here's an example screen:
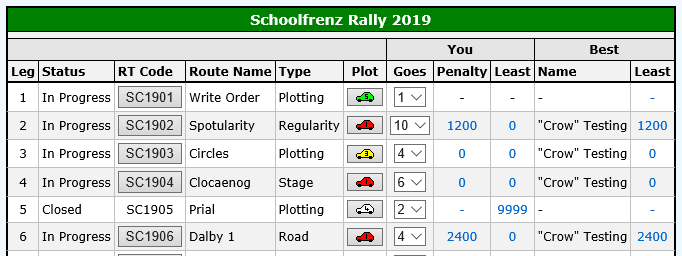
Leg: The sequence number of the section in the
rally.
Status: No Data - the Leg is not
on the system; Not Open - the Leg isn't open yet; Available
- available and open; In Progress - your solving/plotting in a
Leg is
in-progress; Closed
- the Leg has closed.
RT Code: The internal code for the Leg. For
Leg setters this will appear as a clickable
button.
Name: The name of the Leg.
It may be a clue to the type of route or plotting required.
Type: This will be a Real-Time Rally
(Regularity, Road Section, Special Stage), a Route-Card Rally (Plotting)
or a Driving Test. Each Real-Time leg will be an entire
timed regularity/road
section or a special stage. Route-Card will require plotting
only with penalties styled in the form of a regularity.
In a competitive event the
first attempt penalties
on each leg will contribute to overall results.
Plot: A green car
will indicate
that you haven't yet attempted this leg. Goes
will show you are are awaiting attempt 1.
The yellow car  on a Plotting Rally shows that you have started plotting but not
yet submitted your route for marking. Goes
indicates the current attempt number.
on a Plotting Rally shows that you have started plotting but not
yet submitted your route for marking. Goes
indicates the current attempt number.
The red car
means you have completed a Leg. The Goes column shows
the number of your next attempt. You may attempt the leg as many times as you like,
but only your first attempt will count towards ranked
performances or the score in a competition.
The white car
will only appear after a Leg has closed and you haven't yet
attempted the Leg. It means you may still attempt the Leg but
your attempt number will start at #2, so that a #1 does not
interfere with competitive results.
Click on the car to
take you to the rally map screen.
You/Goes: See above. Where this column's
value is 2 or more (or 3 or more if you started a leg after the
rally closed) click the dropdown list to select a previous
attempt number. Then click your plot car and you will be taken
to the normal rally screen in read-only mode, where you will be
able to examine the master route, route card and solution, and the route of your previous attempt.
You/Penalty: The penalty incurred at your first
attempt.
You/Least: The least penalty incurred across all
your attempts. If you click on Penalty or Least value you will be
taken to the rankings for that leg. Rankings are ordered by
attempt number and then penalty, so priority goes to a
competitor's first score on a leg.
Best/Name: The name of the competitor with
the best first attempt (#1) score.
Best/Least: The score of the competitor with
the best first attempt. If you click on the least value you will
be taken to the rankings for that leg. These rankings show the
least penalty across all competitors irrespective of the number
of attempts.
How to Plot a Map Route
On the Status page, when you click on the car under
the Plot column you will be taken to the rally
map. What you see on the rally map depends upon on the style of
the rally you are attempting: Route-Card or
Real-Time. Many of the operations for marking a
route are identical. However on a Real-Time rally designated as
pre-plot some will not need to be used. Operations which are
only applicable to Route-Card Rallies are marked as [P].
Operations which are only applicable to Real-Time Rallies are marked as [R].
Route-Card Rally
If this is the first time you've
chosen this option for a route card, the starting point (TC1)
will be marked with a small red square
 . If you
are re-visiting, your map position, sizing and route will be
displayed from your last saved visit. . If you
are re-visiting, your map position, sizing and route will be
displayed from your last saved visit.
Real-Time Rally
You will just see the rally map.
The following are the operations you can carry out on the
rally map.
Scale the Map
There are six scales/styles of map when marking a route: At the OS 1:50000 scale view there are two levels of
scale. The lowest definition
is called ZOS1 and the higher definition
ZOS2. (always available)
In the OS Vector District view
there are two levels of scale. The lowest definition is called
ZDist1 and the higher definition ZDist2. (sometimes
available)
At the OS Street View there are also two levels of
scale. The
lowest definition is called ZStreet1 and the higher definition
ZStreet2. (always available)
When solving a Route Card use the detail you see at ZOS2 unless
otherwise stated. When marking a route via AutoP(i)lot (see
below) ZOS2 will usually be sufficient, but you are recommended
to go to a Street View when, taking say, the longest route round
a small triangle.
With AutoP(i)lot turned
off, ZStreet1 or ZStreet2 is recommended.
Note: Not all of the following
screen and keyboard operations work in every browser or on every
machine, but at least one of the methods described should work.
There are several ways to scale/style the map.
1) Press the + key on your keyboard to increase the scale;
press the - key on your keyboard to reduce the scale.
2) Use the scroll wheel (if you have one) on your mouse. Forwards to
increase the scale;
backwards to reduce the scale.
3) If you have a touch screen, pinch two fingers together to
increase the scale, or move two fingers apart to reduce the scale.
4) Click the Scale/Pan button in the
control panel to toggle Off to On: two
navigation controls will appear at the top left of the map. The
lower control will scale in/out with the +/- buttons, and the
vertical slider control will allow you to move through the scale
levels. Uncheck the box to remove the controls.
To have the largest plotting area available, maximise your
browser window since the map will grow to fit the available space
(up to a maximum size of 1350 x 940 pixels). It is also
recommended that you run your browser with a single tab for your
plotting page for performance and stability.
OS 1:50000 Maps vs. Street View Maps
Occasionally there will be differences between the two types of
map:
1) Street View might show triangles at junctions. Mark points on
your route before and after the junction and let AP decide the
route around the triangle (unless otherwise instructed)
2) Street View might show slight variations in the course of
roads particularly at junctions or on white roads. Mark your
route to follow the Street View course.
3) Some (usually white) roads may be missing on Street View.
Mark your route along the road you see at ZOS2.
Given these anomalies, PCs will never be sited at points where
such differences might arise.
4) Some 1:50000 features may be missing on Street View (e.g.
Grid Lines, Spot Heights). If you need to mark a point at one of these
features, do this at ZOS2.
Area/Extent of the Map
When you have the right scale of map, to change the area
that is displayed:
1) Use the keyboard arrow keys to pan (in small
increments) left, right, up and
down. For larger increments use the keys Home, End, PgUp and
PgDn.
2) Position the mouse cursor away from any marked route on
the map (see below), Left click and keep the button held down.
The mouse cursor will change from an arrow to a cross. Now drag the map
into the area you require. Release the button when finished.
Depending upon the sensitivity of your mouse or your steady
hand, the start of the dragging operation may sometimes be
interpreted as a left-click. If you find that this intrudes on
marking the points on your route tick the Freeze checkbox (see
below).
3) If you have a touch screen touch the map and drag in any
direction.
4) Check the Scale/Pan box in the panel at the top: two
navigation controls will appear at the top left of the map. The
upper control has clickable arrows to pan (large increments) left,
right, up and down. Uncheck the box to remove the controls.
On most browers you can press the F11 key
to make a window/tab full screen to give your map a greater work
area.
Note: You will not be able to drag the map beyond the
boundaries specified for the Route Card.
Marking Points
There are two methods: 1) AutoP(i)lot (AP) and 2)
Manual.
AP is an automatic means of joining two points by the
shortest* route following roads that have been digitally encoded
in Google Maps. It is the default and standard method
when you start map marking.
*Note: In built-up areas or areas with difficult/narrow
roads, AP will take note of one-way streets or chose
quicker/safer roads, which may not be the shortest or intended
route.
The
Manual
method should be used for parts of your route which are
not automatically recognised by AP. Typically this
might be for tracks and byways (usually white roads) which have
not been digitised for use by AP, or possibly to get you across
a river where there is no road! The manual method will only be
available if any parts of the route require manual marking. You
will be advised on the route card and an AutoP(i)lot checkbox will
appear allowing you to toggle between AP and Manual.
Marking Points (AP)
Usually map style ZOS2 will be most appropriate to AP your route.
It is recommended that you check and adjust your route (if
necessary) at map style ZStreet2 to ensure
the correct roads and small loops have been followed as required.
You mark a point on the route with a left mouse double-click
(but see Click2 below). Your
mouse double-click need only be anywhere on the required road since it
will be moved to the nearest digitised point on the road. (Note:
if you are a bit wayward with your clicking you may end up with
a point in a side road or someone's driveway! This is termed
an"off-router") A small red
square with a dot in the middle
will appear. Your first point
will already be marked as the Time Control at the start of a section.
Your next and subsequent points should ideally be between
each junction (unless the navigation specifies otherwise) on your route. After a short delay, AP will construct
(usually) a shortest
distance route between each consecutive pair of points. Keep
this in mind particularly when taking a route round triangles -
you should ensure your points connect the closest sides of the
triangle. AP may double back on itself to take a shortest route
if you are not precise enough; AP doesn't know that you can't
use the same road twice.
Here's an example for illustration. The solid black tramline
has been used since this gives a better picture of the route at
this map style.
Note the marking at the triangles to force AP the long way
round. Also note that in some cases the automatically plotted
route between points doesn't appear to follow the roads. This is
normal because of the resolution on the OS 1:50000 scale maps.
If you go to Street Views you should see that your tramline
will usually be close to the centre of the road.
Marking Points (Manually)
Use map style ZStreet2 to manually mark your route. You mark a point on the route with a left mouse
double-click (but see Click2 below). Your
mouse double-click should be in the middle of the road. A small red
square with a dot in the middle
will appear. Your first point
will already be marked as the Time Control at the start of a section.
Your next and subsequent points should be at the next bend or
curvature in the road, and straight "tramlines" will be added to connect
the points. The objective is to create a sequence of straight
line segments which trace the route as accurately as possible.
Here's an example for illustration. Note the marking at the small triangle
before you join the "yellow" road (designating a "B" road at
this scale). There could be a Passage Control on the triangle so
the clicking has been deliberate to show the roads
used and the direction of approach and departure. Generally, if
you achieve a marking which covers the road (using
the twin grey style of tramline at ZStreet2) you will have
no problem in visiting the hidden Controls correctly.
"White" Roads
Because AP (or rather the
Google background process) is geared towards public, driveable
roads, be precise with your clicking on "white" roads, perhaps
when trying to force a shortest route that doesn't use
"coloured roads only". Some whites are partially or completely
"unclickable". When this is the case - unless you are advised
otherwise - treat such roads as out-of-bounds.
Moving points:
Hover the mouse cursor over one of the red squares; click the
left button and hold down; drag the square to a new
road/roadside position;
release the left button. New tramlines are drawn from the
previous point and to the next point.
Note: If you don't position exactly over a red square your
dragging operation will drag the map instead.
When AP is switched off the two new tramlines will be straight
lines joining the points.
With AP switched on, new road following routes will be drawn
between the points. Remember that the two new routes will be
independently calculated as shortest routes. Depending upon
where you drag your point, you may not get the result you
expected. Inserting additional points before moving will usually
resolve any inconsistencies.
Deleting points:
1)
Position your cursor within 200 map metres of a point and right
click. DO NOT click ON the point!
2) If right click doesn't work, or you have only
a single button mouse: position your cursor within 200 map metres
of a point hold down the Ctrl key and left mouse double-click (or
single-click if Click2 - see below - is disabled).
3) Click the Delete Mode button
in the control panel at the top of the screen. This will toggle
the left mouse button clicking from inserting to deleting.
Position your cursor within 200 map metres of a point and left
mouse double-click (or single-click if Click2 - see below - is
disabled). Click the Delete Mode button again to toggle back to inserting.
When AP is switched off a straight tramline will be drawn
between the previous and next points.
With AP switched on a new road following
the shortest route will be
drawn between the previous and next points.
Note:
You can't delete or drag the first point (TC1) on a route.
Inserting points:
Position the cursor close to the centre of the tramline where you
want to insert a point and left double-click your mouse
(but see Click2 below).
When AP is switched off the new point will be
placed at the nearest point on your existing route.
With AP switched on the new point will be placed at the nearest
intermediate (invisible) AP point on your existing route.
Note:
Very occasionally AP will draw a straight line between points
("straight-liner") rather
than follow the road. This will occur if the Google Servers are
busy or you have a network outage and a pop-up message should highlight the fact. Just wait a few seconds and carry out your operation again.
Don't leave "straight-liners" on your map as this may incur missed
control or "time" penalties.
Your last point
Continue marking
points to the end of the navigation to define the route.
Location Information [P]
In the references panel immediately above the map, the position of the cursor is
continuously
displayed as an OS Grid Reference (grid lettered 8-digits and a
full numeric 12-digits) and as a Latitude and Longitude (with
decimal minutes and seconds, minutes and seconds, and decimal
degrees).
Note: Location information may be hidden for certain
route cards.
Map Marking Information
There are four
boxes which will be displayed when you hover over one of your
marked points.
East: The OS Grid Easting;
North: The OS Grid
Northing;
Points: The sequence number of your marked point/the sequence number of all the points (including the
invisible ones between marked points); Distance: The distance in
miles of the marked point from the start of the route. Control:
Any additional information - this is used mostly for controls
and route checks when displaying a route card solution.
Note:
Distance may be hidden for certain Route Cards.
Control Panel
Buttons
Freeze
A checkbox to prevent
dragging the map. See Area of the Map above.
Route
To hide the
marker points and tram-lined route click this button. This is useful if you want
to see map detail underneath your markings. Click again to
re-display.
You can also use the Pause/Break key (if you have
one) to do the same thing. Hold down to hide, release to
re-display.
Tramlines
The default tramline style (#1) to mark the route is a black
outer line with a grey inner. If you want a different style
or colour, clicking the button will cycle round a series of 9 different
tramlines. Pressing the F2 key will have the same effect on some
systems. Your chosen style will be saved for your next plotting
session.
Delete Mode
The function of
Delete Mode is described above in Deleting Points.
Scale/Pan
The function of the
button is described above in Scale the Map and
Area/Extent of the Map.
Spy
If you are displaying the map in the
highest 1:50000 scale (ZOS2), clicking the button will launch a
Magnifying Glass. A kilometre-size empty square will appear top
left of the map. Move your mouse pointer to the square,
left-click and it
will attach itself to the pointer. You can now drag the square
across the map and you'll see a x2 version of the clean map (not
your tramlines) underneath.
When you have finished
magnifying, click the Spy button again.
AutoP(i)lot
This will usually be fixed as
On. If manual marking is required at any time
(you will be advised on the route card) you will be able to toggle
between on and off.
Clicks
The default operation for marking or inserting a point is to
double left-click (the button shows 2). This avoids any conflict when dragging the
map or dragging existing points which requires a single
left-click to start the operation.
However, if you have a steady hand and precise mouse, you may
wish is revert to a single left-click (button shows 1) operation
for marking or inserting. The Clicks button will toggle between
the two values.
Sound [R]
Various sound effects are used in Real-Time Rallies. Click this
button to toggle the sounds on/off.
Roamer
If you need to plot map references
click the Roamer button and the
coordinates below the cursor arrow will be displayed as an OS
grid reference (alpha-numeric and full numeric and gridline
indicator), a
Latitude/Longitude (degrees and decimal minutes, degrees minutes
and seconds, decimal degrees) and the What3Words.
Undo
Click to undo your previous map marking operation.
Write
Button initially Off, but can be toggled
On. This allows you to "Write" on the map. When On,
your route marking will be disabled. Instead a mouse left-click (or
double-left-click - see Clicks above) will allow you to place a
 marker anywhere
on the map. Hovering over the marker will show its number and
various formats of location information. To delete a marker
double-click on it. You will find this useful for marking, say,
map references that you wish to pass through or avoid during
your plotting. Click the button to return to Off
and continue marking your route. Your markers only last for the
duration of your plotting session. marker anywhere
on the map. Hovering over the marker will show its number and
various formats of location information. To delete a marker
double-click on it. You will find this useful for marking, say,
map references that you wish to pass through or avoid during
your plotting. Click the button to return to Off
and continue marking your route. Your markers only last for the
duration of your plotting session.
East, North, Points, Distance
When you hover over any
of your plotted points, the following items will be displayed:
full OS grid Easting and Northing; the sequence number of your
plotted point and total geocoded points; the distance of your
point from the start in miles.
Route-Card Rallies Result Feedback
[P]
(This is almost redindant and will be replaced by an equivalent
Route-Card/Real-Time Rallies Procedures).
A table will show how well you did in the following columns:
Control:
TC1, the list of undisclosed PCs and TCs
Cumulative Distance - Yours:
Your cumulative route distance to visit the exact location
of the control. If no distance is shown you've missed the
control.
Cumulative Distance - Ideal:
The master route cumulative distance to each of the
controls. By comparing the Ideal with Yours you can gauge how
well your marking matches the master route.
Timing Distance - Yours:
TCs only. Your cumulative route distance from the last TC. If no distance is shown you've missed the
control.
If you've followed the route correctly your
distance should match or very closely match the ideal inter-TC
distance (see below). If your distance devates from the ideal by
more than 0.0083 miles (equivalent to one second of time) it
will be assumed you have wrong-slotted or shortcut the ideal
route and will be penalised (see
Regulations
for how this is calculated). If you missed the previous TC there
will be no "time" penalties.
Timing Distance - Ideal:
TCs only. The master route cumulative distance from the last
TC.
Your Closest (metres)
How close your route passes to a particular control. If
you've followed the correct route, this should be 0. Greater
than that and your number will be shown in red and
you will be deemed to have missed the control. Missing a PC = 5
marks; missing a TC = 10 marks.
Closest Point -Yours
For information only - your numbered point which was closest
to the control. This includes the via points you clicked and the
invisible ones between.
Closet Point - Ideal
For information only - the numbered point of the master
route where a control was located.
App(roach)
You will approach a control from the right direction if you
visit the point immediately prior to the control point. The
column will show Y(Yes/Correct) or a red X(Incorrect). Incorrect
approach is penalised: PC = 5 marks; TC = 10 marks.
Dep(arture)
You will depart a control in the right direction if you
visit the point immediately after to the control point. The
column will show Y(Yes/Correct) or a red X(Incorrect). Incorrect
departure is penalised: PC = 5 marks; TC = 10 marks.
Penalty
Your penalty at each control highlighted in red.
There will be additional penalty rows if you have taken any hints
for the route card.
Total
For reference the
total number of points on your route and the master route. This
will be greater than the point number of the last TC; the final
point being at the end of the navigation (End of Regularity -
EoR).
The total penalties are shown in red. If your total
penalties exceed 100 marks they will be capped to 100 and
flagged with an asterisk.
Real-Time/Route-Card Rallies
Procedures
See
How to plot a route above for a
description of the controls to the left of the map.
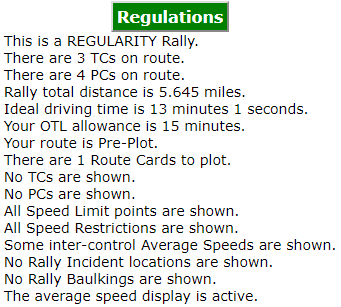
The
Regulations panel for the rally is displayed
showing (depending opon the type of rally): type of rally, the number of TCs and PCs, the
distance (of the complete route, not to the last TC), the
approximate duration to complete the rally (penalty-free) in real-time,
whether the rally is pre-plot and a list of information you will
see on the map if you enter the rally. You can minimise or
maximise the display by clicking on the title, or re-position by
dragging outside the title.
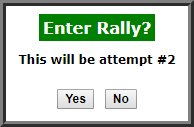
Simultaneously displayed is the Enter Rally dialog. Your Attempt
number will be shown.
If you
have mistakenly arrived here press the No
button to return to the Rallies Status page.
If
you like what you've read in the Regulations click Yes.
The two sections below describe the subsequent procedures
for Real-Time and Route-Card rallies.
 Real-Time
Rallies Real-Time
Rallies
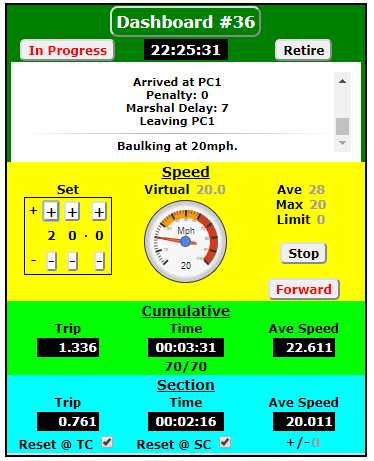
When you
click Yes, the
Dashboard (with the Attempt #) will be displayed in an overlayed window.
This window is displayed for the duration of the rally and can be
moved to a more convenient place on the screen.
You can minimise or maximise the display by clicking on the
title, or re-position by dragging outside the title. The master
clock will display the current time. Note initially the
Quit button near the top. If you don't want to start
the rally now click the button and you will be taken back to the
Rally Status page.
Once you click the
Start button on the Dashboard:
1) The
master clock will count you down to your departure time from
TC1, which will be at least a minute away.
2) The Status
box will display a commentary
during the Leg. The
first entry you'll see is your Start Time and OTL
(Over Total Lateness) time, which is set as a number of minutes after
your scheduled arrival time at the last Time Control. The
default is 15. This may be increased when the navigation is not
straightforward. If you haven't completed the Rally by this time
you will be excluded and given a maximum penalty at all
subsequent controls.
3) If the
event is pre-plot the (tramlined) route will be displayed.
Additional information may be displayed depending upon the
parameters set for the event.
    You may see the TCs (numbered red
markers for Time Controls) or PCs (numbered blue markers for
Passage Controls), average speed changes,
speed limited sections, speed limited points and hazards. If not,
relevant information may be shown in the Route Cards. You won't
see SCs (numbered green markers for Secret Checks), which
operate exactly the same way as PCs except they are, um, secret!;
or CBs (numbered magenta markers for codeboards). You may see the TCs (numbered red
markers for Time Controls) or PCs (numbered blue markers for
Passage Controls), average speed changes,
speed limited sections, speed limited points and hazards. If not,
relevant information may be shown in the Route Cards. You won't
see SCs (numbered green markers for Secret Checks), which
operate exactly the same way as PCs except they are, um, secret!;
or CBs (numbered magenta markers for codeboards).
Any Route Cards will use straightforward
navigation - the kind that you might see on a UK road rally.
There will be nothing that requires Googling of solutions,
otherwise you might go OTL before you've left TC1! Route Cards
will appear as necessary in a separate window, which can be
minimised/maximised/moved like the Regulations and Dashboard
displays.
Some routes that require plotting may indicate visually and
audibly if
you have clicked a point which is not on the intended route.
Your route will be checked will be shown in the
Regulations.
Most stages will be pre-plot however occasionally
the route may be "arrowed" instead. From the start pace notes
will appear as Route Card 0 and will show arrows at each
junction and other key markers on the route. The arrows will
show the direction to take at the next junction(s) (not compass
direction): left  ,
right ,
right  or straight
on or straight
on  . The same
form of arrowing may also be used on regularity and road rallies
too. Additional
navigational or route information may be shown using the symbol . The same
form of arrowing may also be used on regularity and road rallies
too. Additional
navigational or route information may be shown using the symbol
 . .
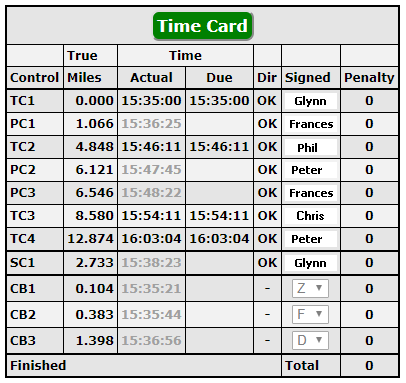
4)
The Time Card will be displayed in another
window. The Time Card can be moved in a similar way to the
Dashboard.
On the
Time Card you'll see the list of controls to visit, and (on road
and stage events) the distance between them and your scheduled
arrival time. SCs and CBs, if there are any, will be shown in a separate
panel below the final TC.
If you click the Quit button now your rally
result will be recorded as Did Not Start.
As the clock
ticks down, you will receive audible alerts (yes, the marshal
speaks to you!) at 30 seconds, 10 seconds, and then
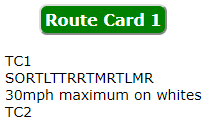
5-4-3-2-1-Crow. On "Crow", if the route is "plot &
dash", Route Card 1 will be displayed.
There may be additional route cards as the event proceeds.
The Start button will be disabled. The Quit button
will change to Retire. Your classification at
this stage will be unknown, so if you close the rally window or
click the Retire button your result will be recorded as Unknown
Retirement with a maximum penalty.
From this point everything is running in
real-time so the rally will require your full
concentration. Typically you will need to focus for around 30
minutes. Shut the door to your man/woman cave, turn off your
phone, stop other applications running on your computer - after all you
wouldn't have such distractions on a real rally. If you need a
pee-break this will have to be absorbed in your elapsed time;
you can't stop the rally and go back to it later!
You must
run the rally in a dedicated window in your browser and stay in
that window until you have finished the rally. Swapping between
applications during the rally may affect the progress and timing
of your car on route.
For a regularity or road rally you
may now need to plot the navigation (for the whole rally or at
least up to Route Card 2).
For all rallies adhere to the
required average speeds/time schedule, and negotiate any hazards
or speed restrictions (that you know about).
The car on
the map  positioned as TC1, won't move until you have marked
your first section of route (if plot & dash navigation) and have set a
speed on the Dashboard. If your marked departure from TC1 is in
the wrong direction, you will be advised with a pop-up message
and your car won't move. positioned as TC1, won't move until you have marked
your first section of route (if plot & dash navigation) and have set a
speed on the Dashboard. If your marked departure from TC1 is in
the wrong direction, you will be advised with a pop-up message
and your car won't move.
Note:
The orientation of the car is fixed and doesn't imply any
particular direction of travel.
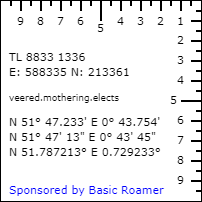 If you need to plot map references
click the Romer button in the control panel.
Drag the Romer around the map and the
coordinates at the top right corner of the Romer will be displayed as an OS
grid reference (alpha-numeric and full numeric and gridline
indicator), What3Words and a Latitude/Longitude (degrees and
decimal minutes, degrees minutes and seconds, decimal degrees). If you need to plot map references
click the Romer button in the control panel.
Drag the Romer around the map and the
coordinates at the top right corner of the Romer will be displayed as an OS
grid reference (alpha-numeric and full numeric and gridline
indicator), What3Words and a Latitude/Longitude (degrees and
decimal minutes, degrees minutes and seconds, decimal degrees).
You mark a route in the same way
as you would on the Route-Card events - see above. Once
your car has traversed or is in the process of traversing a
section of the correct rally route, it will be locked down. A
section is the route between one marker and the next. For
example, as soon as you have clicked your first route marker, and
the car starts moving, that section is locked and cannot be
changed.
Your car will follow the route you have marked
on the map irrespective of whether it is the correct rally
route. You will know the route is correct as you encounter any
undisclosed controls or hazards.
The plotted route
ahead of the marked point after the car can be changed (extended, points deleted or
points dragged).
If you've marked an incorrect
route, you should stop (click the Stop button
on the Dashboard) and delete marked points ahead of your car.
(The car will automatically stop at the last marked point).
If your car is then on the correct route, click new points and
re-start your car.
If your car is not on the correct route,
you will need to reverse. When the car is stopped, click the
Forward button on the Dashboard and it will
change to Reverse. Restart your car and it will
travel "backwards" along your marked route. When the car reaches
the first correct point on the route it will stop and the
direction button will be forced to Forward. You can now delete
any other points on the incorrect route, mark a correct route
and re-start your car.
Your speed may be increased (+ button) or decreased
(- button) in
increments of 10, 1 and 0.1 mph. From stationary any +
click will immediately set your speed to 20mph The maximum speed on a road or
regularity rally is 60mph, and 100mph on a stage rally (you may
assume all stage roads are closed to the public!). However,
there may be points or sections on the rally where you will be
required or forced to maintain a lower speed - see below. You may hit the
Stop button at any time to immediately reduce your speed to 0
mph. Your speed change takes effect after your car has moved to
the next geocoded point.
Movement of the car is dictated by the geocoded
points on your plotted route. Suppose the first point from TC1
is 0.1 miles away. If your set speed is 30 mph this will take 12
seconds. After 12 seconds the car will automatically move to
this point. In between, the stopwatches, tripmeters and average
speed displays (if configured) will be continuously and
proportionally updated.
While your route is ahead of the car, the car will continue
to move along the route towards your last plotted point at your
designated speed. If the car reaches your last plotted point its speed
will drop to zero and will remain stationary until you plot your
next point and reset your speed.
Given the required
speeds/schedule/restrictions from the route card, you will need
to adjust your speed as appropriate.
Regularity Rally
If the first average speed is 25 mph,
you might need to set your starting speed to initially be a bit
faster because there will be short delay from your departure
time while the speed controls are enabled and you adjust your
speed.
If you are delayed on route by speed restrictions or
hazards you will need to adjust the speed upwards to get back on
schedule.
You won't always know where the time controls are
located, so your objective will be to keep as close to the
required average speed as possible.
Whether you are on schedule
or not will be determined by your elapsed time and distance. The
Dashboard contains two trip meters and stopwatches. The first
pair (Cumulative) run continuously and cannot be reset. The second pair
(Section) can
be reset together (double-click in the trip or watch display), individually
(single-click in the appropriate display), or can be configured to both
being reset automatically at a speed change (Reset @ SC) and/or at a TC
(Reset @ TC).
There are average speed displays on the Dashboard but these may
not always be available, so, like a real regularity section you
might need average speed tables to get your timing right.
Road Rally
The schedule is based upon an average speed of 30 mph, but will
in reality be slightly less since inter-control times are
rounded up to the next whole minute. For example, a TC section
of 4.8 miles will have a target time of 10 minutes.
Your
objective will be to arrive at the control within 59 seconds of
your scheduled time. For example, if your due minute is
22:11:00, then any arrival from 22:10:01 to 22:11:59 will give
you a recorded time of 22:11:00. If you arrive in your prior
minute you will not be able to depart the TC until your due
time. If you arrive more than a minute early at a TC you will
automatically be booked in for the next next whole minute.
Earliness or lateness outside the arrival window will
be penalised at the rate of 60 marks per minute late and 120
marks per minute early, and the forward time schedule will be
automatically updated.
If you have set the section stopwatch to be reset at
the TC, the start time of the watch will be set to your
booked-in time.
Since there are no relaxed sections there is no
penalty-free make up time.
The last TC section of a Road
Rally is known as a Selective, and is timed to the nearest
second. Any early arrival and you will be booked in at your due
time.
Stage Rally
The stage
target times are based upon an average speed of 75 mph. There
are no speed restrictions on a special stage other than those
imposed by the route (see later). Any arrival at a stage finish
under the target time will be penalty free.
A technicality about timing
If your car's speed is 30 mph and the next geocoded point is,
say, 0.15 miles away, the time to that point should be 18
seconds. Internally a timer is set to wait 18 seconds until the
car is moved and timed to arrive at the next point. However due
to other parts of the rally software running in parallel and
your computer's processing power being diverted to other
activities, the timer may lag slightly behind the real-time
clock. The lag may only be a few milliseconds per point, but in
a section with many points this can add up to a second or more.
This is compensated for automatically by measuring the lag and
transparently increasing your speed slightly. This does not
however get examined for exceeding any route-imposed speed
limits. This "Virtual" speed is displayed on your Dashboard for
reference.
Time
Control/Passage Control/Secret Check Procedure
When your car
arrives at a geocoded point which is flagged as a control, there
will be an audible alert, your
speed will be set to zero and your Time Card will pop up and be
automatically marked. At this point you may wish to reset your
stopwatch and/or tripmeter. Processing of your time card by the
marshal will take a variable amount of time: between 5 and 10
seconds at a PC (not on a Stage Rally) and 10 to 20 seconds at a TC, plus any waiting
time for taking the next whole minute on a Road Rally. You will see a
countdown in the time card signature box and when processing is
complete a signature will appear. While you are waiting the
speed controls will be disabled so reset your speed as soon as
you have a signature (there will be no audible alert).
At certain controls you may receive additional route information
and your route card display will change.
Codeboard
Procedure
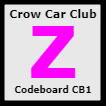
When you pass a
codeboard, the board will pop-up on your rally screen (bottom
right). It will
contain a codeboard number and a code letter. The codeboard will
be displayed for a number of seconds depending upon your current
speed using the formula: seconds = 60/speed. So at 60mph the
board is displayed for 1 second; at 10mph for 6 seconds. Before
the next manned control (TC, PC or SC) you must choose the code
letter from the appropriate (match CB number) dropdown list on the Time Card. If
you don't or you choose the wrong letter, you will be deemed to
have missed the codeboard when it is checked at the next manned
control. There is no penalty for approaching or departing a
codeboard in the wrong direction.
Rest Halts
Certain TCs may be designated as Rest Halts. They will be
flagged with the superscripted value of the rest minutes on the Time Card. Such TCs will be a short
distance from the previous TC. Your scheduled departure time
from a Rest Halt TC will be your scheduled arrival time at the
previous TC plus the rest time rounded up to the next whole
minute. Any cumulative lateness at this point, which would be
eating into your OTL, will be absorbed in your rest time. If you
arrive later than your scheduled departure, your rest time will
be forsaken and you will depart on the next whole minute. There
are no speed restrictions in the section preceeding a Rest Halt
TC.
Speed Limits & Hazards
There is no recognition of real-world speed limits, so
exceeding 30mph through a town centre or village will go
unnoticed. HOWEVER ...
There are five types of speed
restriction or hazards you may encounter:
1)
 Single geocoded
points may be set where you must reduce your speed to a given
limit through that single point. They will
usually be shown in advance on the
route or will be notified on a route card. These will often be
set at the apex of tight bends or junctions. If you exceed the limit you will
have an accident and "go off the road" for the number of seconds
by which you exceed the speed limit e.g. 50 mph through a 40 mph
point and you will be delayed by 10 seconds. You will have to
set your speed to get moving again. Single geocoded
points may be set where you must reduce your speed to a given
limit through that single point. They will
usually be shown in advance on the
route or will be notified on a route card. These will often be
set at the apex of tight bends or junctions. If you exceed the limit you will
have an accident and "go off the road" for the number of seconds
by which you exceed the speed limit e.g. 50 mph through a 40 mph
point and you will be delayed by 10 seconds. You will have to
set your speed to get moving again.
If you exceed the limit by
30 mph or more, your accident will be terminal and you will be
retired from the rally.
2) Certain sections of route may be designated as
speed restricted. When marked on the route the start will be
shown like this  and the end like this
 . If you exceed the
limit when you enter the section there will be an audio warning
and an entry added to your status log. There
may be officials (DSO - Driving Standards Observers) . If you exceed the
limit when you enter the section there will be an audio warning
and an entry added to your status log. There
may be officials (DSO - Driving Standards Observers)
 checking your
speed at one or more subsequent points during the limit. You
may be advised visually or via a route card if a DSO has
parked within a section. If the DSO detects an infringement, the first time you
will be given a warning ("yellow card checking your
speed at one or more subsequent points during the limit. You
may be advised visually or via a route card if a DSO has
parked within a section. If the DSO detects an infringement, the first time you
will be given a warning ("yellow card
 on your Dashboard")
and will be lectured for x seconds, where x is the greater of
your excess speed in mph (rounded down) or 10.
The second time you will be given a warning
("orange card on your Dashboard")
and will be lectured for x seconds, where x is the greater of
your excess speed in mph (rounded down) or 10.
The second time you will be given a warning
("orange card
 on your Dashboard")
and lectured for x seconds, where x is the greater of your
excess speed in mph (rounded down) or 20. The third time you will be excluded
from the rally. on your Dashboard")
and lectured for x seconds, where x is the greater of your
excess speed in mph (rounded down) or 20. The third time you will be excluded
from the rally.
Because the DSO may not always be present
you could take a risk and exceed the limit if you are running
behind schedule!
You will need to be vigilant and note when the limit
has ended if you want to increase your speed. Watch the status
display on the dashboard.
3)
There may be incidents on the route
 e.g. a puncture,
sick navigator/co-driver. Each of these will reduce your speed
to zero until the problem is fixed, automatically after a
notified number of seconds. You will
need to be vigilant and wait until the obstruction disappears
before you can increase your speed.
These incidents will not normally be notified in advance. e.g. a puncture,
sick navigator/co-driver. Each of these will reduce your speed
to zero until the problem is fixed, automatically after a
notified number of seconds. You will
need to be vigilant and wait until the obstruction disappears
before you can increase your speed.
These incidents will not normally be notified in advance.
4) You may get baulked on
route by another car
in front of you
and will have your speed automatically reduced to its speed.
When the baulking section is visible on the route the start will
be shown as  and the
finish as and the
finish as  . Baulking
will also finish when you enter a PC or TC. Again be
vigilant to increase your speed when the obstruction disappears. . Baulking
will also finish when you enter a PC or TC. Again be
vigilant to increase your speed when the obstruction disappears.
5) Regularity Rally only:
This type of marker
 shown on the
route or speed notified on the route card, specifies the new
average speed required from that point. Your current speed won't
be affected, but of course you will need to note the average
speed for your timing calculations. Watch the Status display on
your Dashboard at controls; there may be speed changes notified. shown on the
route or speed notified on the route card, specifies the new
average speed required from that point. Your current speed won't
be affected, but of course you will need to note the average
speed for your timing calculations. Watch the Status display on
your Dashboard at controls; there may be speed changes notified.
6) There may be Give
Ways (GW) signs  when joining a higher class road at a junction. When you reach
the GW sign your speed will drop to zero and how long you wait
to restart depends on your arrival speed. The time in seconds is
your speed/10 and rounded up. So a speed of 28mph will incur a
delay of 3 seconds; and 65mph a delay of 7 seconds.
when joining a higher class road at a junction. When you reach
the GW sign your speed will drop to zero and how long you wait
to restart depends on your arrival speed. The time in seconds is
your speed/10 and rounded up. So a speed of 28mph will incur a
delay of 3 seconds; and 65mph a delay of 7 seconds.
Your
Average speed, Maximum Speed and
Limited speed at any time are shown on
the Dashboard.
NOTE:
You have to be VERY VIGILANT when you are approaching speed
limit points or sections. You won't know the location of the
geocoded point immediately before the speed limit - the ideal
point to reduce your speed. Reduce your speed too early and you
will lose time. Reduce your speed too late and you could be
penalised, excluded or suffer a terminal accident.
End of Rally
The rally will end when you: reach the last TC on route; are
excluded for speeding offences; have had an accident; have gone
OTL; or have chosen to retire.
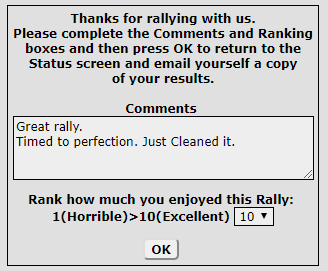
A Feedback form will then pop-up
requiring comments about the rally and a ranking from 1 to 10.
Clicking the OK btton (active only after entering
comments and a ranking) will take you back to the Rallies Status
screen and email you a copy of your results.
Route-Card
Rallies
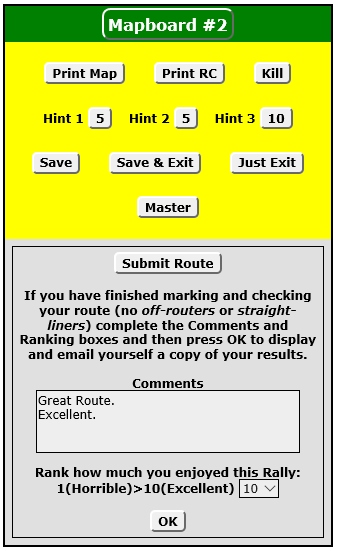
When you
click Yes, the
Mapboard (with the Attempt #) will be displayed in an overlayed window.
This window is displayed for the duration of the rally and can be
moved to a more convenient place on the screen.
You can minimise or maximise the display by clicking on the
title, or re-position by dragging outside the title. Note initially the
Just Exit button. If you don't want to start
the plotting now click the button and you will be taken back to the
Rally Status page.
The Route Card will
also be displayed in a separate window and can be
minimised/maximised/moved like the Regulations and Mapboard
displays.
Tip:
If you hold down the Ctrl key the dragging operation is
suspended so that you use your mouse click to mark and
copy/paste the Route Card text.
The navigation will vary from straightforward
- the kind that you might see on a UK road rally, up to cryptic
which may require some research to decode.
There is an example below. The top half shows the navigation and
the lower half the solution, which will be shown after you have
submitted your route for marking.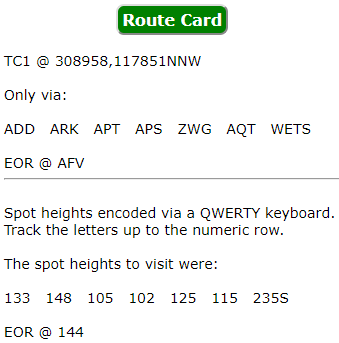
Mapboard Controls:
Print Map
Click and the whole map will be displayed in a new window. This
will allow you to print the map using the print facilities
available to your browser and printer. The extent of the map is
usually set so that it fits to a 1:50000 paper map scale on a
sheet of A4.
Print RC
Click to
display the Route Card in a separate window for printing.
Kill
If you've made a right muck-up of
marking your route and would like to start over, the Kill button
will remove your route except for the first (TC1) marker. When
you click on the button you will need to hold down the Ctrl key.
A pop-up question will ask for confirmation before carrying out
the kill process.
Hint 1/2/3
Some Route Cards may have up to three hints
available to help you with a solution or plotting. You may open a
hint at any time during your solving/plotting period but will
incur the one-off penalty in minutes shown in the hint column. The hints
(if more than one) will be progressive in information; hint 1 will
be less revealing than hints 2 and 3. If you are stuck on solving a
Route Card always take the hints since this will give you the
satisfaction of being able to submit a solution without incurring
a maximum penalty.
To see a hint click the button. You will be
asked to confirm your request before continuing. Hints already
taken will be highlighted in green.
Save
Click this button to periodically save your route and
continue plotting.
Save & Exit
Click this button to
save your route and return to the Rally Status screen. You can
return later to continue plotting.
Just Exit
Exit to the Rally Status screen.
Saving your route [P]
At any point you can save your marked route so far by clicking
one of the Save buttons. Your marked map display settings and position will be
stored.
Save regularly. You can save as many times as
you like before you submit your route for marking.
Before you save your route for the last time go to Street View
and look for "off-routers". These are marked points which are
just off your intended route down a side road or in someone's
drive way. They'll look something like this:
Simply drag the marker to the centre of your intended road.
Small imperfections like this may incur a missed PC or timing
penalty.
Also eliminate any "straight-liners". See Inserting Points
above.Master/(Plotted)
Initially Master will
be displayed in red and not be accessible. Once you have
submitted your route for marking you will be able to click
Master to display the master route and the Route Card solution. The button will change to
Plotted and clicking will re-display your own route.
Submit
Route
Successive clicks of the button will show/hide
the Submit dialog. When you happy with your marked route
complete the Comments and Ranking boxes and then press OK to
display and email yourself a copy of your results.
A table will show how well you did in the following columns:
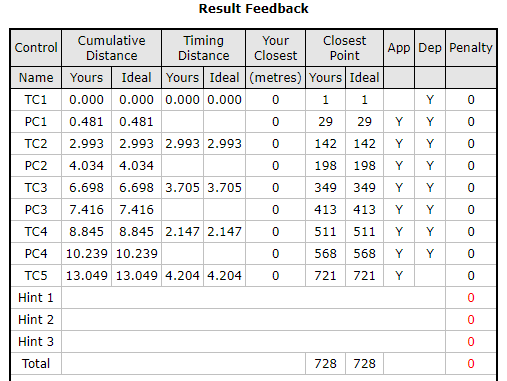 Control: Control:
TC1, followed by the list of undisclosed PCs and TCs.
Cumulative Distance - Yours:
Your cumulative route distance to visit the exact location
of the control. If no distance is shown you've missed the
control.
Cumulative Distance - Ideal:
The master route cumulative distance to each of the
controls. By comparing the Ideal with Yours you can gauge how
well your marking matches the master route.
Timing Distance - Yours:
TCs only. Your cumulative route distance from the last TC. If no distance is shown you've missed the
control.
If you've followed the route correctly your
distance should match or very closely match the ideal inter-TC
distance (see below). If your distance devates from the ideal by
more than 0.0083 miles (equivalent to one second of time) it
will be assumed you have wrong-slotted or shortcut the ideal
route and will be penalised (see
Regulations
for how this is calculated). If you missed the previous TC there
will be no "time" penalties.
Timing Distance - Ideal:
TCs only. The master route cumulative distance from the last
TC.
Your Closest (metres)
How close your route passes to a particular control. If
you've followed the correct route, this should be 0. Greater
than that and your number will be shown in red and
you will be deemed to have missed the control. Missing a PC =
300
marks; missing a TC = 600 marks.
Closest Point -Yours
For information only - your numbered point which was closest
to the control. This includes the via points you clicked and the
invisible ones between.
Closet Point - Ideal
For information only - the numbered point of the master
route where a control was located. If your route is perfect
Yours and Ideal should be identical.
App(roach)
You will approach a control from the right direction if you
visit the point immediately prior to the control point. The
column will show Y(Yes/Correct) or a red X(Incorrect). Incorrect
approach is penalised: PC = 300 marks; TC = 600 marks.
Dep(arture)
You will depart a control in the right direction if you
visit the point immediately after to the control point. The
column will show Y(Yes/Correct) or a red X(Incorrect). Incorrect
departure is penalised: PC = 300 marks; TC = 600 marks.
Penalty
Your penalty at each control highlighted in red.
There will be additional penalty rows if you have taken any hints
for the route card.
Total
For reference the
total number of points on your route and the master route. This
will be greater than the point number of the last TC; the final
point being at the end of the navigation (End of Regularity -
EoR).
The total penalties are shown in red. If your total
penalties exceed 6000 marks they will be capped to 6000 and
flagged with an asterisk.
Other Information
Your
attempt number, comments, rank, and elapsed time will also be
shown.
You will also be able to display the above
information in the detailed results pages.
Driving Tests
Driving Tests simulate those you might encounter on a real
regularity rally.
You are required to follow a marked
course in the correct direction without hitting any
route-defining obstacles. In this simulation you will need to
avoid hitting the red test boundaries, the black internal
boundaries and cones.
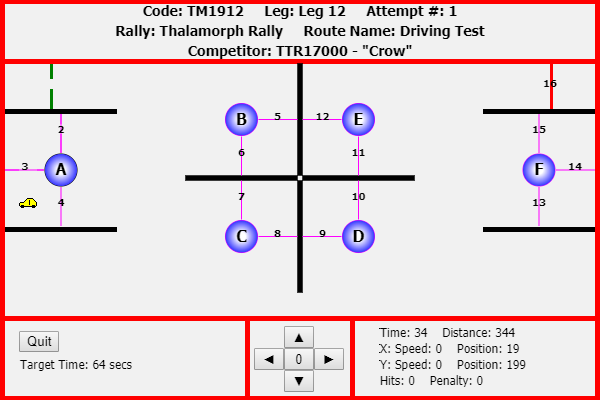
Navigation around the tests can be by two methods:
1)
Bottom centre below the test area is a mouse-clickable arrow pad
to control the speed of your car horizontally or vertically. For
example, clicking the right arrow will accelerate your car to
the right by one unit of speed. Clicking again would change the
speed to 2 and so on. Clicking the left arrow will reduce the
horizontal speed right by 1 on each click until 0, then the
horizontal speed left will increase by 1. The up and down arrows
work in a similar way vertically. So, if you needed your car to
travel in a south-easterly direction you would set your speed
right and down to be the same. The 0 in the middle of the arrows
is the brake; click it and both the horizontal and vertical
speeds will be set to zero.
2) Use the keyboard arrow keys
(dedicated keys on your keyboard or via a numeric pad) to
operate in the same way as the on-screen arrows. The shift key
is the equivalent of the 0 (brake) above.
The required
route is defined by 3 sections: the start, cones, the finish.
From the car's starting position move right to cross the green
start line (numbered 1) and start the timer. When you have
completed your tour around the cones cross the red stop line
(the highest numbered) to stop the timer.
Each of the
cones has a letter (A, B, C etc.) which dictates the order to be
visited. Each cone may show up to four magenta radials: top,
right, bottom, left, which will be numbered in sequence. To
successfully visit a cone you will need to cross the radials in
the correct numerical order. If you miss a cone or visit in the
wrong order you will receive a maximum penalty for a "Wrong
Test" and your attempt will be over.
During the test if
you hit any of the red or black boundaries, 5 seconds will be
added to your overall test time for each hit. When you hit a
boundary you will bounce away and your car will stop. The bounce
distance will increase with increasing speed of impact.
The target time to complete the test is shown bottom left of the
test area. This will usually be automatically calculated in
seconds as 4 times the number of route lines you need to cross.
If your finish time (which will include your "hit
seconds") is less than the target time your penalty will be
zero; otherwise your penalty will be the finish time less the
target time.
As
the test progresses you will see a statistics display bottom
right of the test:
Your current Time in seconds; the Distance
you have travelled (in screen pixels); Your current X
(horizontal) and Y (vertical) Speed and Position; the number
of Hits with boundaries or cones; and your penalty so far.
If you just want to examine the test and not start, press the
Quit button. This will not count as one of your attempts.
If you have any queries regarding marking a route please post
them to the TTR Forum so the
answers can be shared with all competitors.
|
