|
Copyright © Ray Crowther 2025 | |||||||||||
| Internet Table-Top Rally Championship 2006 Round 4 - Rally Round Rally Route Card Solutions |
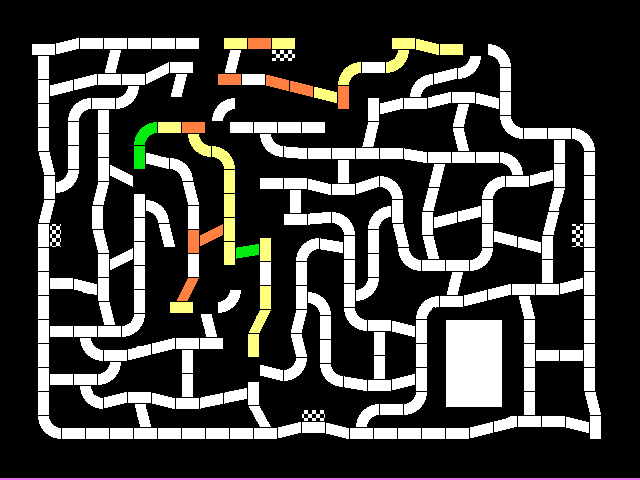
sponsored by See also Navigational Regulations. To save a local copy of this page: click File, Save As in your browser. Version 1 - December 2, 2006 @ 02:00 Use the northern half of map 137 only. Treat Grid Line Northing 80 as the edge of the map. Each Time Control on this event is named after a monster
which had to be found and destroyed in the 1 - Intellect Devourer/Gargantuan Gargoyle Start @ B road at edge of map in GS5998. Master/Expert/Novice Navigators via B(D) 113 5599 248 5398/LWR PROW(F) 133 B(D) B(D) B(D) 5897 206 to Intellect Devourer @ next GL. B(D) = Boundary(District), PROW(F) = Public Rights Of Way(Footpath). Trickiest bit was completing the LWR 5398 before using the footpath in 5397. Master Navigators only From Intellect Devourer via HTC(Lm) F(D) 5594 5594 MCA(LC) HTC(Lm) MCA(LC) HTC(Lm) MCA(LC) HTC(Lt) F(D) 3073 4475 F(D) 4575 4696 173 to Gargantuan Gargoyle @ last plot. The Welsh version, see map legend. HTC(Lm) = Bridleway, HTC(Lt) = Footpath, MCA(LC) = Red Diamond. Look in the italicised GSs for spot heights to use. 2 - Goblin Orc/Bilious Beast Gargantuan Gargoyle @ SH173 in GS5587. Master/Expert/Novice Navigators via 11 junctions, 3 gradients and 4 spot heights (excluding 173) to Goblin Orc @ the last plot. Master Navigators only From Goblin Orc via 10000020010000010100100100 to Bilious Beast @ 100m before Beambridge crossroads. The number sequence was a count of the of
junctions in consecutive GS's on route. Map 2 Solution (a) 3 - Evil Earwig/Phenomenal Flea Bilious Beast @ 100m before Beambridge crossroads. Master/Expert/Novice Navigators via 8 T 953529 T 52529 T 19 T 252 9T3/W 539 T 453529 T 5529 T 69 T 79 T 89 T 852519 T 79 T 79 T 8 Evil Earwig @ last instruction. Crossing coded (northings) grid lines. 8T9 = Eight(y)-nine etc. Master Navigators only From Evil Earwig via 2R 2T 1G 2W 1H 34 1J 1L 1M 1N 3I 3L 23 25 27 4C 2B 50 54 30 5D 36 38 71 41 83 49 110 61 155 224 143 1113 1210 1010111 to Phenomenal Flea @ SH209. Declining number base of grid lines. 2R =
99base36, 2T=99base35, 1G=50base 34 etc. The correct decoding was: 4 - Pulsating Plutonian/Galactic Goo Phenomenal Flea @ SH209 in GS4887.
Master/Expert/Novice Navigators via the top route to the Pulsating Plutonian @ gradient. Sections of coloured roads to use. A few missed the shortest route from PC4 to PC5. Master Navigators only From the Pulsating Plutonian via the middle-left route to the Galactic Goo at YGG in GS4488. Same again with a double loop around the middle section. 5 - Astra Armpit/Shreaded Slug Galactic Goo at YGG in GS4488. Master/Expert/Novice Navigators (GL46/B4371) (OOGG) (YYYYW/RD) (OGG) (YYY/RD) (4890) (SO 47666 91603) (GL50) (473½924½) (GL86) Astra Armpit @ A49. Avoid the () bits. The route at the start differed for Masters because of RC4-part2, but the PCs were unaffected. Master Navigators only From the Astral Armpit now via (n>297B5477/GLmetGL50129Y/RO228GL43147brooGL44/W+rk) to the Shreaded Slug @ YYYY in GS4497. Trickier avoid bits strung together. 6 - Gelatinous Cube/Withering Wraith Shreaded Slug @ YYYY in GS4497.
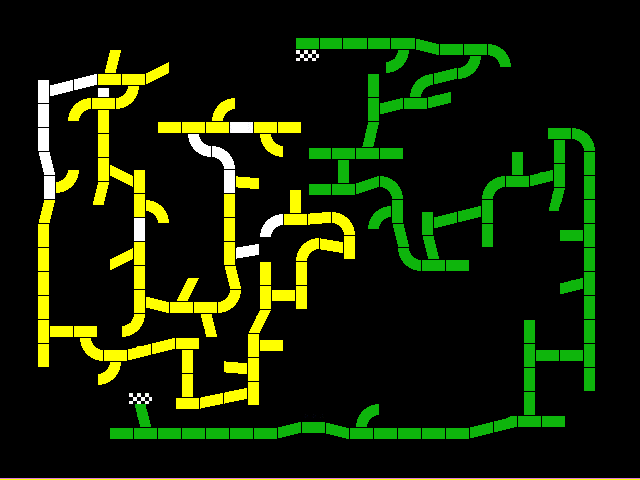
Master/Expert/Novice Navigators Follow the green route to the Gelatinous Cube in 50 metres. Basically just a odd shaped herringbone. Master Navigators only From the Gelatinous Cube follow the other route to the Withering Wraith @ YYW in GS3697. Ditto with helpful road colours. 7 - Cycloptic Saturnian/Marauding Mass Withering Wraith @ YYW in GS3697.
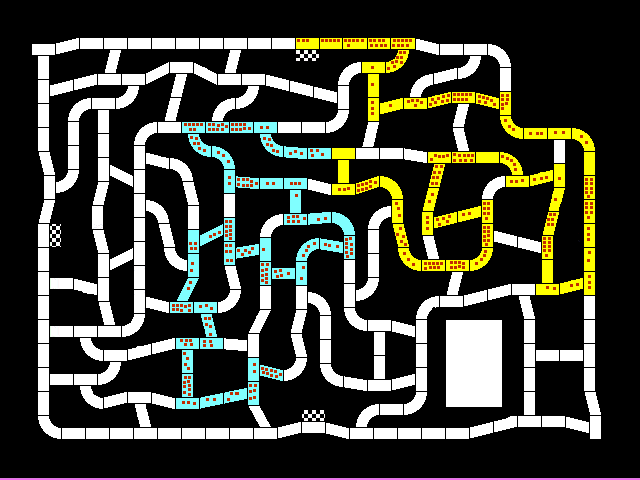
Master/Expert/Novice Navigators via yellow route to Cycloptic Saturnian @ last instruction. Counting the dots on the "dominos" gives the following list of in-order map references: 35689911 31589773 32209732 32209611 33509582 35279489 35309300 Master Navigators only From Cycloptic Saturnian via blue route to Marauding Mass @ RRYY in GS3392. Counting the dots on the "dominos" gives the following list of anagrammatic map references: 364929 376922 371902 34259156 349922 345945 332926 8 - Foaming Frenzoid/Nauseous Neptunian Marauding Mass @ RRYY in GS3392. Between junctions on red roads you average 30 mph; on orange roads - 25 mph; on yellow roads - 20 mph; and on white roads 15 mph. Master/Expert/Novice Navigators This are the times it took you (to the nearest second rounded down) to travel from junction to junction. 36 35 45 21 19
25 100 82 120 94
49 40 171 32 151
29 386 65 92 65
This is the TSD table I used. Master Navigators only From Foaming Frenzoid, these are the times it took you (to the nearest
second rounded down) to travel
from junction to junction ... however, each time you stay on the same
colour of road between consecutive junctions you increase your speed by 5
mph. The speed resets to normal when you start a new colour. 83 16 172 14 169
88 23 4 5 19
16 52 159 142 36
44 91 126 65 271
70 72 66 74
This is the TSD table I used. 9 - Dastardly Dalek/Germinating Jovian Nauseous Neptunian @ northernmost YOO in GS3286. Master/Expert/Novice Navigators
Dastardly Dalek at next junction (YYW). Well, just a thought provoking herringbone. Master Navigators only From Dastardly Dalek via
to Germinating Jovian @ YYRR in GS3185. Each black on white square represented a GS. The arrows only showed departures only to the east or south; unarrowed were departures to the west or north. The white on black squares represented crossroads within a GS (the second was one square out). The white in 3383 was really a NTR but there was no other way to go and no PC to check. 10 - Giant Tick/Malignant Martian Germinating Jovian @ YYRR in GS3185. Master/Expert/Novice Navigators On the way to the Giant Tick at the entrance to Pentiken: cross the River Clun four times; cross the River Unk three times; avoid 2980; use two white roads; and pass through 12 gradient arrows. For shortest route you had to use the two shortest whites - many didn't. Master Navigators only From the Giant Tick go via 397 568 675 1480 1770 Malignant Martian is at the last plot: SH406 in GS2389. Spot height sums: 1(397), 2(252,316), 3(231,198,246), 4(446,404,251,379), 5(319,277,392,376,406) 11 - Slimy Spider/Orrible Ooze Malignant Martian @ SH406 in GS2389. Master/Expert/Novice Navigators
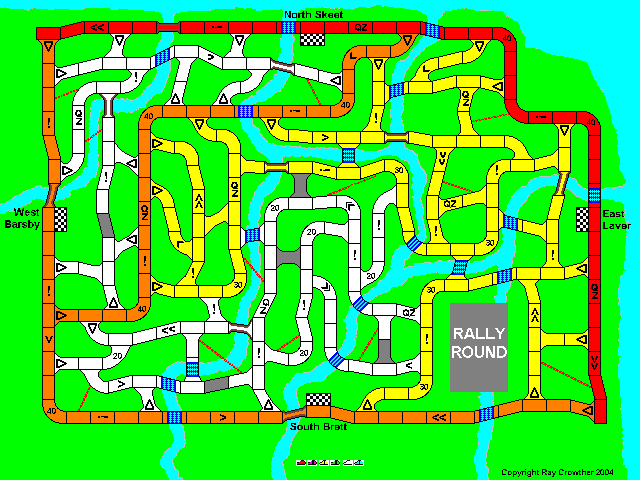
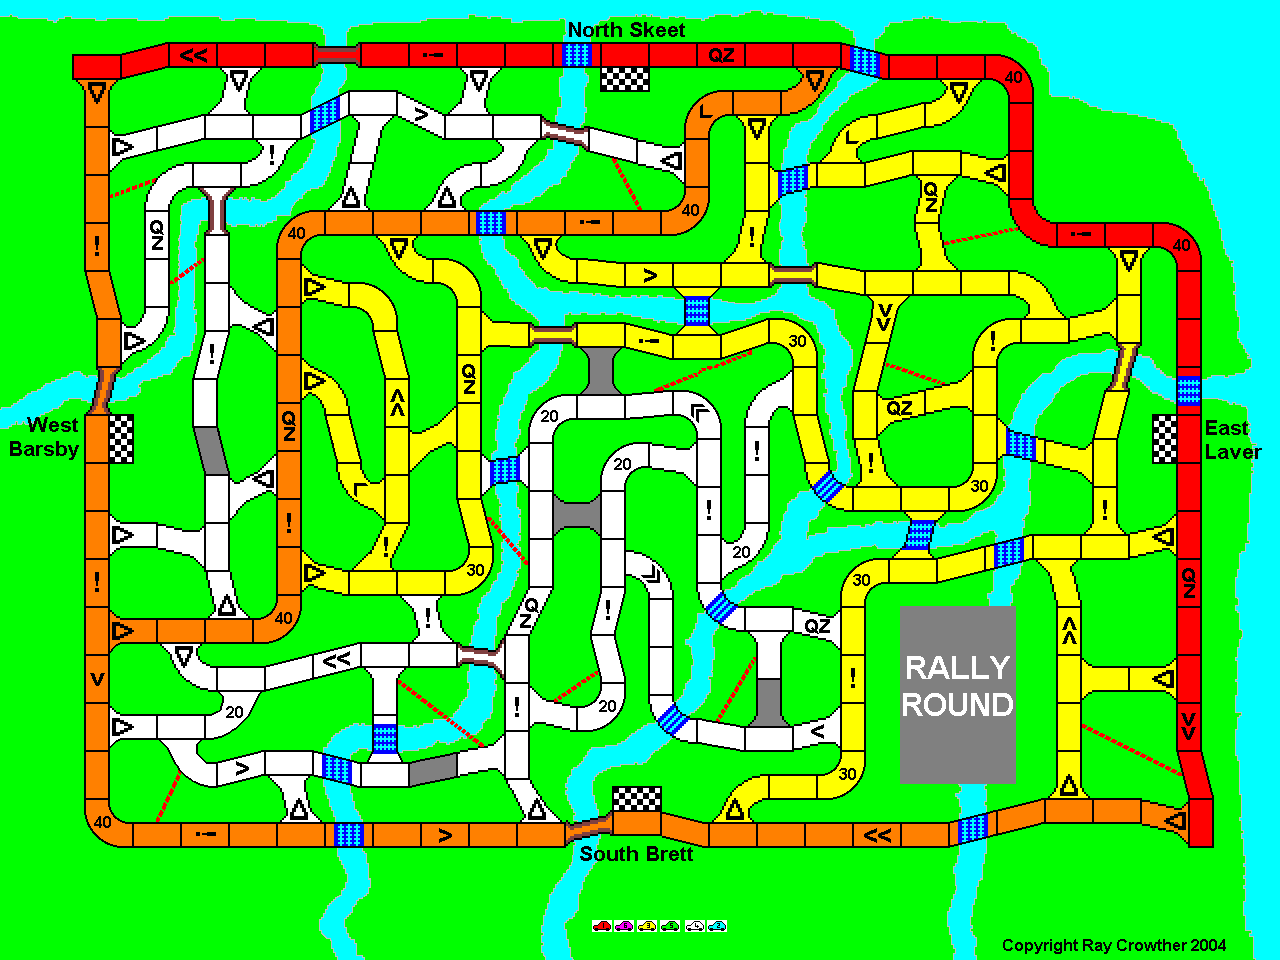
via the following: E LWR E LWR N E E E LWR N N E N LWR LWR E E E N E E N E N E N E N E N Crossing Eastings and Northings and a few LWRs. Master Navigators only From Slimy Spider via the following: E? E? E E E N E N E E/N E E N e E E E N E N E N N w E e N N E N E E E N E w E N E E N E N E e N E N E w e N E w N E e N E N w E N? N? E to Orrible Ooze @ Perthybu. Same again but more difficult with crossings into E(ngland) and W(ales). 12 - Metamorphised Mercurian/Menacing Mutant Start @ North Skeet (chequered square). You can download a larger version of this map from here. In working out shortest routes each "square" or footpath (red dotted line) equals 1 unit.
Master/Expert/Novice Navigators via the following: splash hazard yump +20% wet +14% GW TTTT footpath shhh! pedestrians? care crossing TL RT RT TL steep boggy mud? H2O uphill shortcut attention to Metamorphised Mercurian @ ford. Just track the variously named symbols on the map. Master Navigators only From Metamorphised Mercurian via the following (passing through all the partial squares shown):
(Footpaths may be used if required) to Menacing Mutant at last square. Tricky to get the shortest route and most avoided. Difficult to place just five strategic PCs to check route. No one got this completely right. The competitor solution here is correct but for the two blue unarrowed corrections. |
||||||||||
|
|


