|
Rally Kit
Driver
Card
D4 |
Allows Any speed on R/O bends. |
Starting Speed Card
S6 |
Allows the following starting speeds
R/O roads - 10
Y roads - 60
W roads - 10 |
Navigator
Card
N2 |
Allows the following speed on roads Yellow
QZ - 40
Bridge - 50
Bend - 40 |
Acceleration Card
A1 |
Allows the following accelerations
R/O roads - 20
Y roads - 20
W roads - 20 |
Equipment
Card
E3 |
Can finish moves on Fords without
penalty |
Deceleration Card
B5 |
Allows the following decelerations
R/O roads - 30
Y roads - 30
W roads - 10 |
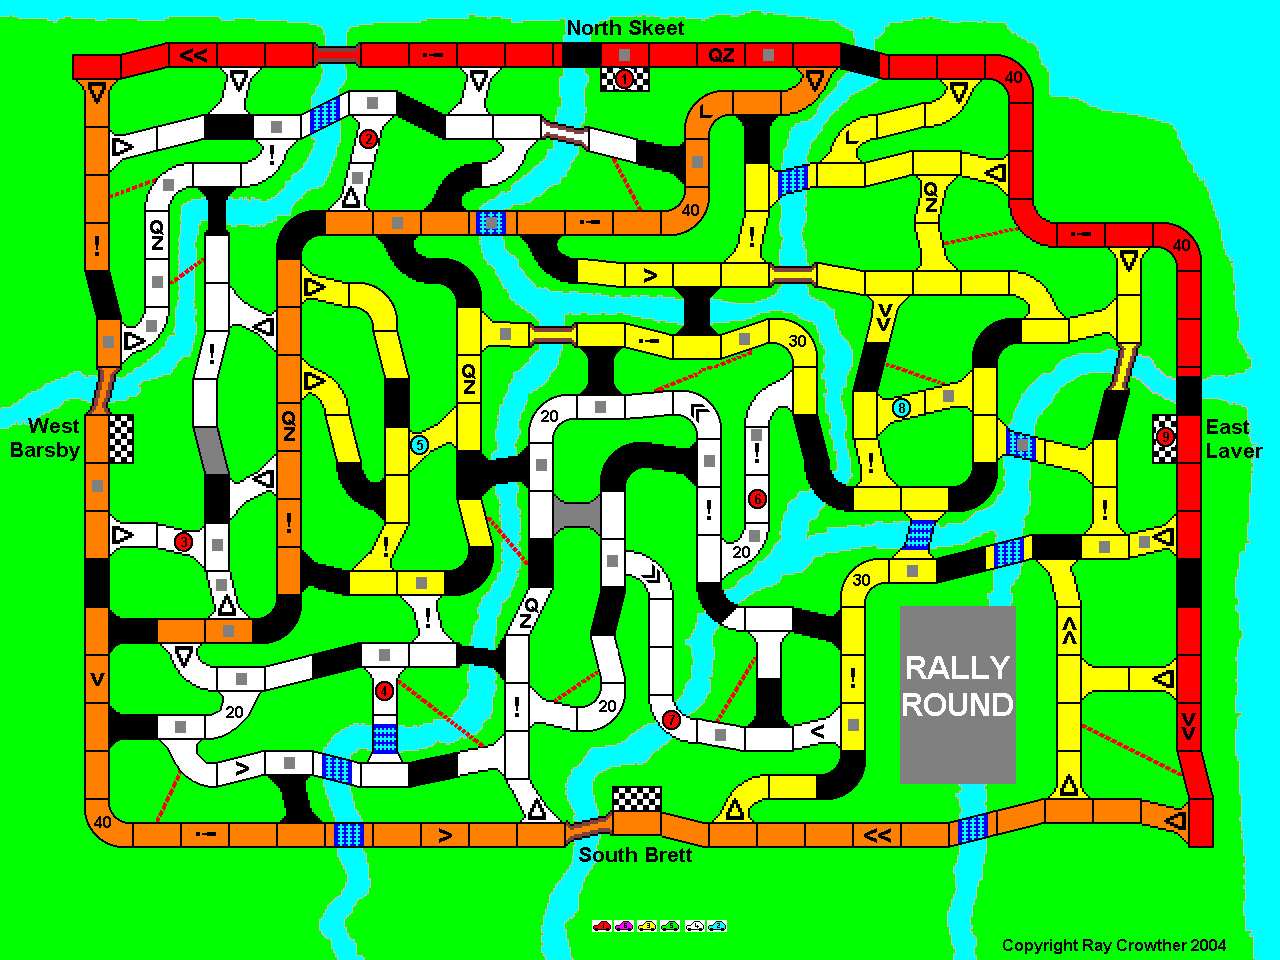
Rally Route

Follow the route for this rally by avoiding the black squares (which
are designated as Black Spots).
The following moves are marked on the map with small grey squares.
| Route to |
Dist
Squares |
Sp-
eed |
Time |
1 |
2 |
3 |
4 |
5 |
6 |
7 |
8 |
Time
Taken |
Pen-
alty |
| TC2 |
19 |
|
7:00 |
10 |
30/A |
40/+1 |
50/D/E |
20/B |
20 |
10 |
|
7:00 |
- |
| RTC3 |
16 |
24 |
6:40 |
10 |
20 |
30 |
20 |
10 |
10 |
30/A |
50/A |
7:36 |
0:56 |
| TC4 |
15 |
|
5:00 |
10 |
10 |
10 |
30/A |
20 |
30 |
40 |
|
7:00 |
2:00 |
| PC5 |
(9) |
|
|
10 |
30/A |
50/A |
|
|
|
|
|
|
|
| STC6 |
23 |
|
7:40 |
40/S/N |
50/N |
40/N/+H1 |
60/A |
|
|
|
|
6:10 |
- |
| SSF7 |
17 |
|
2:50 |
10 |
30/A |
30 |
20 |
40/A/-H1 |
60/A |
|
|
5:40 |
2:50 |
| PC8 |
(14) |
|
|
10 |
30/A |
40/N |
60/A |
|
|
|
|
|
|
| TC9 |
27 |
|
9:00 |
10 |
30/A/E |
40 |
10/B |
40/S6 |
|
|
|
9:00 |
- |
| |
TOTAL |
5:46 |
TC1 to TC2 (Road Section)
(1) Standard Starting Speed of 10. Note that a chequered square is
deemed to be a Red road for movement purposes.
(2) Accelerated from 10 to 30. Standard rules allow an acceleration of 10,
but acceleration of 20 was chosen using card A1 which allows an acceleration
of 20 on a red road.
(3) Accelerated from 30 to 40. Finished a move on a downhill single gradient
so advanced an extra square (indicated by the +1)
(4) Accelerated from 40 to 50. Card D3 was used to exceed the permitted
speed of 40 mph through the bend. Finished the move on a ford, but didn't drown
because card E3 was used ("Allows a move to finish on a ford without
being forced to miss turns").
(5) Now needing to slow down to reach TC2 on time, decelerates from 50 to 20
using card B5 which permits a deceleration of 30 on Orange roads.
(6) Continues at 20.
(7) Decelerates from 20 to 10 to land on TC2 after exactly 7 moves/minutes -
the correct target time, so no penalties.
TC2 to RTC3 (Regularity at 24mph)
(1) Starts the Regularity section at 10.
(2) Accelerates from 10 to 20.
(3) Accelerates from 20 to 30.
(4) Decelerates from 30 to 20.
(5) Decelerates from 20 to 10 to stop at Give Way square.
(6) New Starting Speed of 10 after stopping at a Give Way.
(7) Accelerates from 10 to 30 on an Orange road using card A1.
(8) Accelerates from 30 to 50 on an Orange road using card A1. There were only 3 squares left
to reach RTC3 so only 3/5ths of the move were used, i.e. 3/5ths minute = 36
seconds. So the total duration for the section was 7 minutes 36 seconds;
hence
penalties of 56 seconds of lateness incurred because the ideal time
was 6 minutes 40 seconds.
RTC3 to TC4 (Road Section)
(1) Starts at 10.
(2) Stays at 10 to stop at Give Way.
(3) Restarts at 10.
(4) Accelerates to 30 on a White road using card A1.
(5) Decelerates to 20.
(6) Accelerates to 30.
(7) Accelerates to 40 to finish the move at TC4. 7 moves/minutes in total
which is 2 minutes late for a target time of 5 minutes.
TC4 to PC5 to STC6 (Selective)
(1) Standard Starting Speed of 10.
(2) Accelerates to 30 on a White road using card A1.
(3) Accelerates to 50 on a White road using card A1 to finish exactly at
PC5.
(4) New Starting Speed (after stopping at a PC) of 40 on a Yellow road using card S6. Also uses card N2
which permits a speed of 40 through a QZ on a Yellow road.
(5) Standard Acceleration of 10 to 50. Also uses card N2 which permits a
speed of 50 over a Humpbacked Bridge on a Yellow road.
(6) Standard Deceleration to 40. Also uses card N2 which permits a
speed of 40 through a bend on a Yellow road. Lands on a Hazard! square and
picks up card H1.
(7) Accelerates to 60 on a White road using card A1. There is only 1
square left to STC6, so only 1/6th of the 7th move was used: 1/6th minute
= 10 seconds. So the total duration for the section was 6 minutes 10
seconds, well within the target time of 7 minutes 40 seconds. There are no
penalties for being early on a Selective so no penalty incurred.
STC6 to SSF7 (Special Stage)
(1) Standard Starting Speed of 10.
(2) Accelerates to 30 on a White road using card A1.
(3) Stays at 30, bend approaching.
(4) Decelerates to 20 for the bend.
(5) Accelerates from 20 to 40 on a White road using card A1. Uses the
Hazard! card H1 picked up earlier to exceed the maximum speed on a Rough road.
(6) Accelerates to 60 on a White road using card A1. There are 4
squares left to SSF7, so only 4/6ths of the 6th move was used: 4/6th
minute = 40 seconds. So the total duration for the section was 5 minutes
40 seconds, well over the target time of 2 minutes 50 seconds, so a
penalty of 2 minutes 50 seconds was incurred.
SSF7 to PC8 to TC9 (Road Section)
(1) Standard Starting Speed of 10.
(2) Accelerates from 10 to 30 on a White road using card A1.
(3) Accelerates from 30 to 40. Also uses card N2 which permits a
speed of 40 through a bend on a Yellow road.
(4) Accelerates from 40 to 60 on a White road using card A1 to finish the
move exactly at PC8.
(5) Standard Starting Speed (after stopping at a PC) of 10 from PC8.
(6) Accelerates from 10 to 30 on a Yellow road using card A1.
(7) Accelerates from 30 to 40.
(8) Decelerates from 40 to 10 on a Yellow road using card B5 to finish the
move on a Give Way.
(9) Starting Speed of 40 from the Give Way on a Yellow road using card S6
to finish the move exactly at TC9. 9 moves/minutes in total which equals
the target time, so no penalties.
Not a bad effort. The greatest penalty was incurred on the Special
Stage so a better choice for the Driver card (which wasn't used) would have
been D6 which removes speed restrictions round bends on White roads. An
alternative Starting Speed card might have helped on White roads, but
would have hindered on Yellow roads.
|

