|
Click here to
download a PDF version of this page for printing.
Once you've registered for the 2012 Championship,
you may login using your
Competitor Number and Password.
The procedures that you follow
below will also apply to Route Cards on an event.
Route Card Status
The Route Cards for the next
event will be displayed on the Status page during the opening times for the event.
However, Route Card 0 will always be available. The Status page
also provides additional details about the availability of Route Cards.
Click on
Map 0 in the PDF Map column and save the map to your
computer. Print out the map. This will be your paper
map for solving a Route Card.
Click on
Map 0 in the Display Map column to view the maps you
will use to mark your solution.
Click the START or CONTINUE button. You will be
taken to the Route Card page.
Route Card
The Route Card will be displayed with up to six
additional links:
Printable Route Card
Click to open a new page with the Route Card conveniently
laid out for printing.
Display Map
The same as Display Map on the Route Card Status page.
PDF Map
The same as PDF Map on the Route Card Status page.
Plot Route
Click to open a new page where you can mark your route on a
displayed map. See below for detailed instructions.
Display Map Solution
Only available for Route Card 0 so that you can view the master
route.
PDF Map Solution
Only available for Route Card 0 so that you can print the master
route.
You don't have to solve Route Card 0. Look at the display or
PDF solution map. The route starts opposite a footpath in Grid Square 9013 (TC1) and
finishes at spot height 82 in Grid
Square 8614 (TC2). On the route there are 10 Passage Checks (PCs).
TCs are shown with a red circle; PCs with a blue circle.
Your practice objective is to accurately mark this route on a map and
approach and depart the PCs in the right direction. You'll lose
points if you don't visit the PCs correctly.
Correctly means:
a) that your marked route passes within 30 metres of the
correct location and
b) your angles (direction) of approach and departure are
within 30 degrees of the actuals.
These tolerances should capture your intended
route even allowing for a bit of wayward marking. They might be
adjusted depending upon the ease or difficulty of a particular
Route Card (See also Relaxed Marking below)
You will need to be particularly careful when marking the
route around small loops. In the sample route note the loops
especially in Grid Squares 9009, 8811 and 8612/8613.
How to mark a route
On the Route Card Status page click START or CONTINUE under
the Action Column for Route Card 0. This takes you to the Route
Card page. You have no Route Card to solve so click on the link
Plot Route.
The working map for marking your route will be displayed. If
this is the first time you've chosen this option for a Route
Card, the starting point (TC1) will be marked with a small red
square. If you are re-visiting, your map position, sizing and
route will be displayed from your last saved visit.
Zoom the map
There are six styles of map::
At the OS 1:50000 scale view there are two levels of zoom. The lowest definition
I call ZOS1 and the higher definition
ZOS2. (always available)
In the OS Vector District view
there are two levels of zoom. The lowest definition I call
ZDist1 and the higher definition ZDist2. (sometimes
available - see example in Route Card 0)
At the Street View there are also two levels of zoom. The
lowest definition I call ZStreet1 and the higher definition
ZStreet2. (always available)
When solving a Route Card use the detail you see at ZOS2 unless
otherwise stated. When marking a route via AutoP(i)lot (see
below) ZOS2 will usually be sufficient. With AutoP(i)lot turned
off, ZStreet1 or ZStreet2 is recommended.
There are several ways to zoom/style the map.
1) Press the + key on your keyboard to increase the scale ("zoom-in");
press the - key on your keyboard to decrease the scale ("zoom-out").
2) Use the scroll wheel on your mouse. Forwards to zoom-in;
backwards to zoom-out.
Size the map
Use the combinations keys of Ctrl with + to zoom-in and
increase the size of the displayed map area. Use Ctrl with - to
reverse the process. Ctrl with 0 will restore the original size
of the map area, but will keep the same scale.
Area of the map
When you have the right scale and size of map, to change the area
that is displayed:
1) Use the keyboard arrow keys to the pan left, right, up and
down.
2) Position the mouse cursor away from any marked route on
the map (see below), Left click and keep the button held down.
The mouse cursor will change from an arrow to a cross. Now drag the map
into the area you require. Release the button when finished.
Depending upon the sensitivity of your mouse or your steady
hand, the start of the dragging operation may be sometimes be
interpreted as a left-click. If you find that this intrudes on
marking the points on your route tick the Freeze checkbox (top
right of screen)
Note: You will not be able to drag the map beyond the
boundaries specified for the Route Card.
Marking Points
There are two methods: 1) Manual and 2) AutoP(i)lot (AP)
Manual is the original method of map marking used in Round 1 (The
Nearest FarAway Place Rally) of the the 2012 Championship. This
method should still be used for parts of your route which are
not automatically recognised by AP. Typically this
might be for tracks and byways (usually white roads) which have
not been digitised for use by AP. Further details are
discussed below.
AP is an automatic means of joining two points by the
shortest route following roads that have been digitally encoded
in Google Maps. It is the default method when you start map
marking. Use can switch back to manual by unticking the
AutoP(i)lot checkbox.
Marking Points (Manually)
Use map style ZStreet2 to manually mark your route. You mark a point on the route with a left mouse
double-click (but see Click2 below). Your
mouse double-click should be in the middle of the road. A small red
square with a dot in the middle
 will appear. Your first point
will already be marked as the Time Control at the start of a section. will appear. Your first point
will already be marked as the Time Control at the start of a section.
Your next and subsequent points should be at the next bend or
curvature in the road, and "tramlines" will be added to connect
the points. The objective is to create a sequence of straight
line segments which trace the route as accurately as possible.
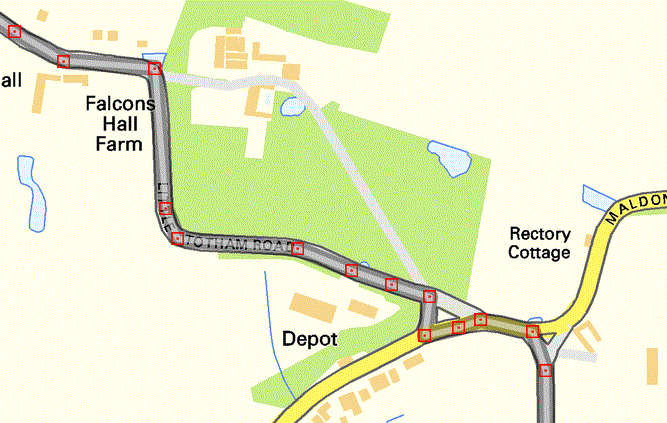
Here's an example for illustration. Note the marking at the small triangle
before you join the "yellow" road (designating a "B" road at
this scale). There could be a Passage Control on the triangle so
I have been very deliberate with my clicking to show the roads
used and the direction of approach and departure. Generally, if
you achieve a marking which covers the road (using
the twin grey style of tramline at ZStreet2) you will have
no problem in visiting the hidden Controls correctly.
Marking Points (AP)
Usually map style ZOS2 will be most appropriate to AP your route.
I recommend that you check and adjust your route (if
necessary) at map style ZStreet2 to ensure
the correct roads and small loops have been followed as required.
You mark a point on the route with a left mouse double-click
(but see Click2 below). Your
mouse double-click need only be anywhere on the required road since it
will be moved to the nearest digitised point on the road. (Note:
if you are a bit wayward with your clicking you may end up with
a point just off the road in someone's driveway!) A small red
square with a dot in the middle
will appear. Your first point
will already be marked as the Time Control at the start of a section.
Your next and subsequent points should ideally be between
each junction on your route. After a short delay, AP will construct a shortest
distance route between each consecutive pair of points. Keep
this in mind particularly when taking a route round triangles -
you should ensure your points connect the closest sides of the
triangle. AP may double back on itself to take a shortest route
if you are not precise enough; AP doesn't know that you can't
use the same road twice.
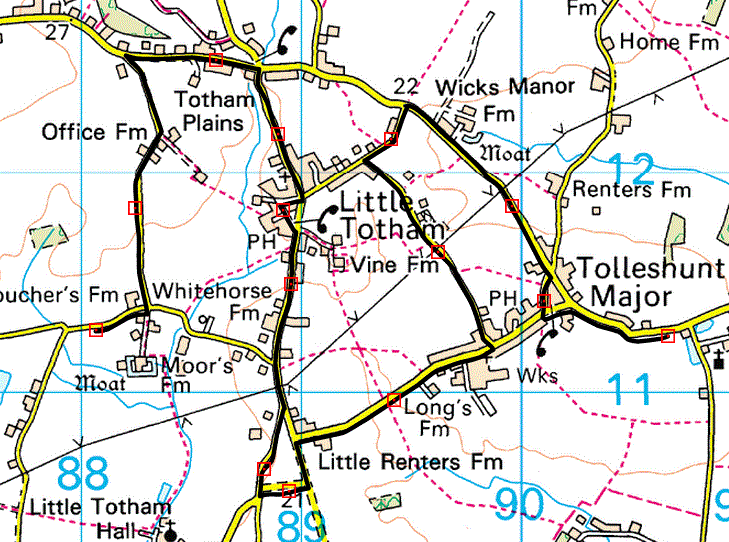
Here's an example for illustration. The solid black tramline
has been used since this gives a better picture of the route at
this map style.
Note the marking at the triangles to force AP the long way
round. Also note that in some cases the automatically plotted
route between points doesn't appear to follow the roads. This is
normal because of the resolution on the OS 1:50000 scale maps.
If you zoom-in to Street Views you should see that your tramline
will actually be close to the centre of the road.
Moving points:
Hover the mouse cursor over one of the red squares; click the
left button and hold down; drag the square to a new position;
release the left button. New tramlines are drawn from the
previous point and to the next point.
Note: If you don't position exactly over a red square your
dragging operation will drag the map instead.
When AP is switched off the two new tramlines will be straight
lines joining the points.
With AP switched on, new road following routes will be drawn
between the points. Remember that the two new routes will be
independently calculated as shortest routes. Depending upon
where you drag your point, you may not get the result you
expected. Inserting additional points before moving will usually
resolve any inconsistencies.
Deleting points:
Position your cursor within 200 metres of a point and right
click.
When AP is switched off a straight tramline will be drawn
between the previous and next points.
With AP switched on a new road following shortest route will be
drawn between the previous and next points.
Inserting points:
Position the cursor close to the centre of the tramline where you
want to insert a point and left double-click your mouse
(but see Click2 below).
When AP is switched off the new point will be
placed at the nearest point on your existing route.
With AP switched on the new point will be placed at the nearest
intermediate (invisible) AP point on your existing route.
Location Information
In the panel above the map the position of the cursor is
displayed as an OS Grid Reference (grid lettered 8-digits and a
full numeric 12-digits) and as a Latitude and Longitude (with
decimal minutes and seconds).
This information may be hidden for certain Route Cards.
Map Marking Information
In the panel above the Location Information there are three
boxes which will be displayed when you hover over one of your
marked points. Major: The sequence number of the marked point;
Total: The sequence number of all the points (including the
invisible ones between marked points); Distance: The distance in
miles of the marked point from the start of the route.
Distance may be hidden for certain Route Cards.
Click2
The default operation for marking or inserting a point is to
double left-click. This avoids any conflict when dragging the
map or dragging existing points which requires a single
left-click to start the operation.
However, if you have a steady hand and precise mouse, you may
wish is revert to a single left-click operation for marking or
inserting. The Click2 checkbox will be ticked by default;
uncheck the box to enable single clicking.
Timing Point
Some route cards will have an intermediate "Timing Point" (TP)
to be visited. When this is the case the Timing Point checkbox
will appear top right of the map.
The instructions on the route cards will tell you how to
calculate the location of the TP; this may be a simple statement
like "10 miles from the start" or more complicated like "1.5
miles after the last bridge". Make sure you place one of your
route points at where you think the TP is located. Mark the
checkbox, hover over your point and left-click your mouse. The
red square will change to a green circle. If you had already had
a TP marked the old one will be restored to a red square.
Tramline Style
The default tramline style to mark the route is a thin black
line. If you want a different style
or colour pressing F2 will cycle round a series of 9 different
tramlines.
Clean Map
To hide the marker points and route press the Pause/Break key.
Release to re-display.
Saving your route:
At any point you can save your marked route so far by clicking
the Save button. Your display settings and position will be
stored.
Save regularly. You can save as many times as
you like before you submit your route for marking.
OS 1:50000 Maps vs. Street View Maps
Occasionally there will be differences between the two types of
map:
1) Street View might show triangles at junctions. Mark your
route to take the shortest route through the triangle.
2) Street View might show slight variations in the course of
roads particularly at junctions or on white roads. Mark your
route to follow the Street View course.
3) Some (usually white) roads may be missing on Street View.
Mark your route along the road you see at ZOS2.
Given these anomalies, PCs will never be sited at points where
such differences might arise.
4) Some 1:50000 features may be missing on Street View (e.g.
Grid Lines, Spot Heights). If you need to mark, say, a finish
control at one of these points, do the following:
> Enlarge your map area by pressing Control + a few times (which
also ups the Zoom level).
> Get back to ZOS2 by pressing - (the minus key) twice.
> Your OS 1:50000 map should now be larger. Mark your point.
> Zoom to the ZStreet2 map and move the point (if necessary) to the centre
of the road nearest to the point.
> Press Control 0(zero) to restore all views back to normal.
Relaxed Marking
Some Route Cards or sections of Route Cards will be
designated as Relaxed Marking, This will typically be
when using twisty white roads (which are not accessible by AP) which might require many points to
accurately define the route. You might, for example, be asked to
simply mark your route at each junction visited. The total
distance for any "Time" penalties will be based upon the "straight
line" route.
Conversely, if a route section is defined, for example using
spot heights, as 75
88, this
would mean there will possibly be a Passage Control between spot
heights 75 and 88 so your route marking should be accurate
between these points to ensure the control is visited correctly.
Submitting Your Route.
When you are happy with your final route, save it for the last time
and then click Back to Previous Page. You will be
returned to the Route Card page.
In the Submit Route? form enter any comments about the
Route Card or your solution, and use the dropdown box to rank
how much you enjoyed the Route Card. Press the Submit Route
button.
On an event after this point you will not be able to
access the Route Card page unless a Route Card is flagged as
ReDo. On Redo Route Cards like Route Card 0 you can
submit a solution as many times as you like until you have
mastered the route marking procedures and, ideally, end up with zero
penalties.
Your route will be compared with the master route and you will
be taken to the Result Feedback page.
Result Feedback
A table will show how well you did in the following columns:
Control:
TC1, the list of undisclosed PCs, TP, TC2
Cumulative Distance - Yours:
Your cumulative route distance to each of the controls.
Cumulative Distance - Ideal:
The master route cumulative distance to each of the
controls. By comparing the Ideal with Yours you can gauge how
well your marking matches the master route.
If your total distance (at TC2) is outside the permitted range
(see Regulations)
your distance will be highlighted in red and you may incur Time
Penalties.
Your Closest (metres)
How close your route passes to a particular control. You
need to be under 30 metres for your visit to be recognised.
Outside of that range and your number will be shown in red and
you will be deemed to have missed the control. Missing a PC = 5
marks; missing a TC = 30 marks.
Closest Point -Yours
For information only - your numbered point which was closest
to the control.
Closet Point - Mine
For information only - the numbered point of the master
route which was closest to the control.
Approach - Yours
Your plotted direction of approach to the control shown as a
compass point and bearing in degrees. If this differs from the
tolerance allowed (plus/minus 30 degrees) from the Ideal, your
entry will be highlighted in red and you will be penalised
accordingly (PC = 5 marks; TC = 30 marks).
Approach - Ideal
The Ideal direction of approach from the master route.
Depart - Yours
Your plotted direction of departure from the control shown
as a compass point and bearing in degrees. If this differs from
the tolerance allowed (plus/minus 30 degrees) from the Ideal,
your entry will be highlighted in red and you will be penalised
accordingly (PC = 5 marks; TC = 30 marks).
Depart - Ideal
The Ideal direction of departure from the master route.
Penalty
Your penalty at each control highlighted in red. If your
total penalties exceed 100 marks they will be capped to 100 and
flagged with an asterisk.
You may want to visit Map Marking Questions
and Answers - feedback from old, non-AP style of
marking.
|
